


Advanced Search
Search the Knowledgebase


| Author: Microengine Views: 20036 Created: 14-07-2015 11:14 AM | 0 Rating/ Voters |
 |
This article contains steps to add staff record at the XP-GT/ XP-GTR controller.
Applies To:
- XP-GT1200L, XP-GT3200L, XP-GT1200LABX, XP-GT3200LABX, XP-GT3200LE, XP-GT3200LCPX, XP-GT500LE, XP-GTR1200L, XP-GTR3200L
 Resolution Summary Resolution
Perform this steps if the controller is not connected to the software:
- Enter
 Programming Mode.
 - Press '2' for Database menu.
- Press '2' for Add User. This will bring us to the Add User screen.

- Select the user type in this screen. There are 4 available options of user type when add user at XP-GT and XP-GTR controller:
- [0] for Prox Card
- [1] for ID No.
- [2] for Mifare (Contactless Smart Card)
- [3] for MyKad
- Press '
 ' to accept and proceed to the next screen.
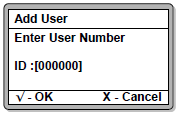
 - Enter the User ID in this screen. Press '' to confirm.
- Enter the TimeZone No. for this user. Press '' to confirm.

- Choose to allow 1:N Operation for this user. Press '' to confirm.
 If you choose NO, you will not be able to use finger print if any finger print mode is selected as Verification Mode. (This setting cannot be changed after saved)
 - This screen allows you to select the Verification Mode for the user.
- Enter a number to choose the Verification Mode. There are 7 modes to choose from:
- [0] is by door
(Verification Mode is according to the current verification mode of the door entered/exited) - [1] is by Token only
- [2] is by Token and Pin
- [3] is by Token and Fingerprint
- [4] is by Token, Pin and Fingerprint
- [5] is by Fingerprint only
- [6] is by Fingerprint and Pin
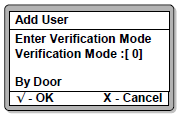 Token – Is card or ID number depends on selected Token Type.
 - A confirmation that the new user is installed will appear as shown in the screen below, should all the information entered is correct and valid.
- Repeat steps 3 to 10 to add a new user, or press '×' to return to Database Menu.

Custom Fields
- Summary: This article contains steps to add staff record at the XP-GT/ XP-GTR controller.
- Search Tags: fingerprints, xp-gt, enroll fingerprints, install fingerprints, delete fingerprints, fingerprints only
Related Articles
Comments
-
There are no comments for this article.
Submit Feedback on this Article
