


Advanced Search
Search the Knowledgebase


| Author: Microengine Views: 12148 Created: 02-11-2015 11:33 AM | 0 Rating/ Voters |
 |
This article contains the steps to configure Door Access setting using XP-SNET.
Applies To:
- XP-SNET
- Software xPortalNet
 Resolution Summary Resolution
Please perform steps below:
Wiring Connection
- Please set the Address for the controller. See How to configure address setting (Unit No) for Multi-Door Controller?

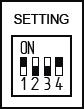
- Please set the Setting for the controller. DIP Switch 2 and 3 must be turned ON for Door Access + Alarm Monitoring mode.
- Reset the controller after changing the DIP Switch. Please press the Reset button from the controller board.

- Please connect all input to the controller board. (Optional)
 All sensor input point must be connected with resistor 3k3 in supervised input mode.
 - Please connect all output to the output relay on the controller board. (Optional)

xPortal Server Setup
- Login to xPortalNet Server.
- Open Connection Setup. Go to Server Admin › Connection Setup.
- Add one connection.
 Problem adding connection? See
 How to configure the XP-SNET controller using network connection? or How to configure the XP-SNET controller using RS485/ RS232 connection?
 - Click OK to confirm and save settings.
- Open Controller Setup. Go to Server Admin › System Device Setup › Controller.
- Add controller Model No.
- Set the Unit No according to the Address set on the controller.

- Click OK to confirm and save settings.
- Open Door Setup. Go to Server Admin › System Device Setup › Door.
- Add door. Below is example to add 2 doors.
- Door 1: Unit No = 0

- Door 2: Unit No = 1

- Details on Door Setup, see How to configure address setting for XP-SNET, Plato reader and MK800?
- Login to xPortalNet Client.
- Open Send Door Settings. Go to Device Comm › Send Door Settings.
- Select controller name and click Send All Settings button.

- Noticed that there is "Door ???" appear from the transaction list.
- This is because, just now only 2 doors is configured.
- "Door ???" will not be appear if all doors is already configured.

- The controller and door status shall be "Up".
- Please flash card at the reader to confirm changes have been saved correctly.
- Transaction with Valid Entry Access/ Valid Exit Access will be shown.

- The transaction appear is according to the reader setup (Either As Entry/ As Exit).
- Please configure the reader correctly.
- If there is any connected Input/ Output, please configure the setup at the software as following:
Custom Fields
- Summary: This article contains the steps to configure Door when in Door Access + Alarm mode using XP-SNET controller.
- Search Tags: configure door access, xp-snet, input output configuration, input, output, how to configure door access
Related Articles
- How to configure the XP-SNET controller using network connection?
- How to configure the XP-SNET controller using RS485/ RS232 connection?
- How to configure address setting for Plato reader?
- How to configure address setting for XP-SNET reader?
- How to configure Input?
- How to configure Instruction Control for Input to trigger Output?
- How to configure Output?
Comments
-
There are no comments for this article.
Submit Feedback on this Article
