


Advanced Search
Search the Knowledgebase


| Author: Microengine Views: 16559 Created: 21-10-2015 02:21 PM | 0 Rating/ Voters |
 |
This article contains steps to enable AntiPassback settings for multi-door controller. AntiPassback function is to prevent Double Entry or Double Exit access through a door or area.
Applies To:
- XP-M2000i, XP-SNET
 Problem Resolution Summary Resolution
Perform following steps accordingly.
Step 1: Enabling AntiPassback Function
- Login to xPortal Client. Make sure controller already up.
- Open Controller Setup. Go to Data Setup › System Setting › Controller.
- Following window will be shown.

- At AntiPassback Function Enabled, select "Yes".
- At Advanced Controller Setting, you may set following field or leave the default value:
- Auto AntiPassback Reset Mode (This field is to specify mode to clear antipassback status automatically)
- Not Used OR
- Reset All Card Holders
- Auto AntiPassback Reset Time (This field is to specify time (HH:MM) to execute AntiPassback reset)
- Set the time to reset the antipassback violation
- Click OK to confirm and save changes.
 Auto AntiPassback Reset Mode & Auto AntiPassback Reset Time applicable to XP-M1000i, XP-M2000i & XP-SNET only
Single-Door controller? See  How to enable antipassback settings for single-door controller?
Step 2: Configure AntiPassback in Staff Records
*This is applicable to XP-M1000i and XP-M2000i only.
- Open Staff Records. Go to Data Setup › Access Data Setting › Staff Records.
- Modify the staff records.
- Following window will be shown.
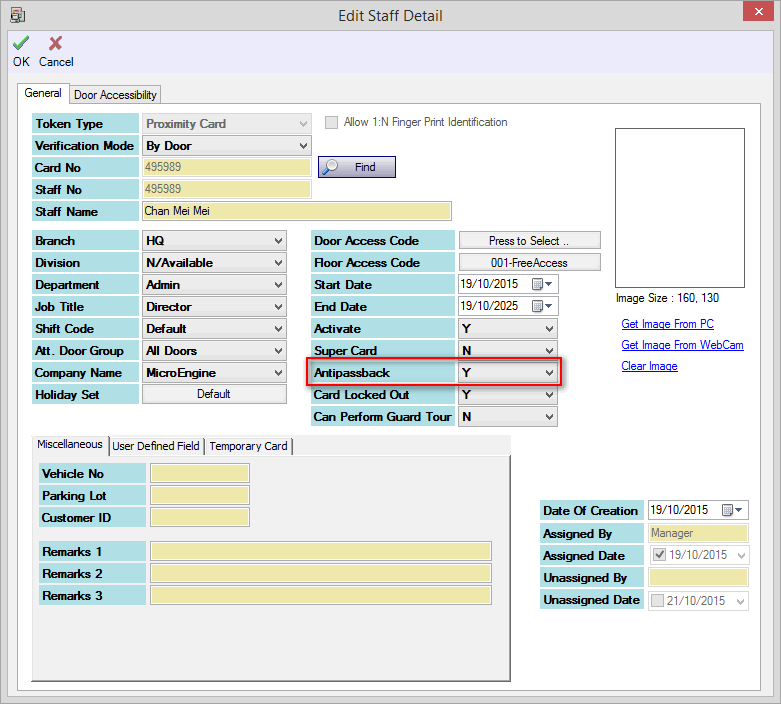
- Toggle the Antipassback field accordingly. This setting will take effect only if antipassback function has been enabled.
- Y - To enable the antipassback checking
- N - To disable the antipassback checking
- Click OK to confirm and save the changes.
Step 3: Configure Door Zone Code
- Open Door Setup. Go to Data Setup › System Setting › Door.
- Following window will be shown.

- Set the entry zone code and exit zone code accordingly:
| Field | Description | |
|---|---|---|
| AntiPassback Entry Zone Code |
|
|
| AntiPassback Exit Zone Code |
Example:
|
|

Details about Zone Code, see How to configure Door Zone Code?
Step 4: Monitor Transaction
- Flash valid card at the reader and observe the Latest Event List. User should get valid entry/exit access as shown below.
- Then, try to flash the same card at the same reader. User shall get the following transaction.
Double Entry at Entry Reader:
Double Exit at Exit Reader:
- The right order to prevent antipassback violation is to flash card at the entry reader followed by exit reader.
- If user's card is in AntiPassback state, user will not be able to access the door until the state is cleared. Follow Step 5 below to clear the AntiPB Violation mode.
Step 5: Clear AntiPB
- To clear the card from AntiPB Violation mode, download Clear AntiPB setting to the controller. Go to Device Comm › Send Staff Setting › Select controller name › Clear AntiPB.
- Make a card holder selection or user can just download setting to all card holders by tick All Card.

- Flash card again and observe the transaction. User should be able to access the door.
- Finish.
Custom Fields
- Summary: This article contains steps to enable antipassback settings for multi-door controller.
- Search Tags: antipassback, configuration, xp-m2000i, xp-snet, multi-door, anti pass back, anti passback
Related Articles
Comments
-
There are no comments for this article.
Submit Feedback on this Article
