


Advanced Search
Search the Knowledgebase


| Author: Microengine Views: 19749 Created: 29-06-2015 05:14 PM | 0 Rating/ Voters |
 |
This article contains steps to configure auto visitor sign out at the xPortalNet software.
Applies To:
- Software xPortalNet
 Resolution Summary Resolution
Please perform steps below:
- Make sure controller is already "Up".
- Make sure the visitor's Visiting Staff records already exists. (Staff Records)
- Login to xPortalNet Client.
- Open Door settings. Go to Data Setup › System Settings › Door.
- Modify the door that you wish to enable the visitor auto sign out feature.
- Find Enable Visitor Auto Sign Out. Select "Yes".
- Click OK to confirm and save the changes.

- Open Card Records. Go to Data Setup › Access Data Settings › Card Records › Get Now.
- The Card Detail Setup window will be shown.
- Click Add button to add new card detail for visitor.
- Click OK to confirm and save the changes.
 The card type "Permanent" is for the staff records, meanwhile "Visitor" is for visitor card records.
- To sign in visitor, open Visitor Still In List tab then simply click Visitor Sign In (F3) button.
- The following window will be shown. Enter the ID No and select the ID Type of visitor.
- Make sure the card reader is already connected to the PC if you are going to select ID Card or Passport.
- Scan the ID Card and it will automatically redirect to the Visitor Sign In Transaction window.
- If you select others, enter any ID No then click Next to sign in.Different ID Type can be choose. The visitor information will be retrieved from the ID Card selected. If you choose Others, you will need to fill up your information manually.

- If the visitor card is not available, the following pop up message will be shown. You must add the visitor card first to continue. Refer to "Step 2: Add Card Records" above.

- The following window will be shown if visitor card is available.

- When sign in the visitor, the Visiting Staff and Visitor Card No will automatically populated. Please select preferred Visiting Staff & Visitor Card No.
- Enter the visitor information.
- Click Next to sign in. The following pop up message will be shown if visitor successfully sign in.

- You may find visitor record from the Visitor Still In List tab when visitor successfully signed in.

- To sign out visitor, just flash visitor card at the reader.
- The visitor will automatically sign out.Please present the correct visitor card upon exiting the door.
» Circumstances (Card No is Blocked due to some security reason)
- If the visitor card has been blocked, kindly request from the System Admin to unblock the card and sign out manually.
» For safety measure, Auto Sign Out Visitor will be disabled after the card has been blocked. - After unblocked the card, open Visitor Still In List tab then simply click Visitor Sign Out (F7) button.
- The following window will be shown. Enter the Visitor Card No.
- Click OK to sign out.

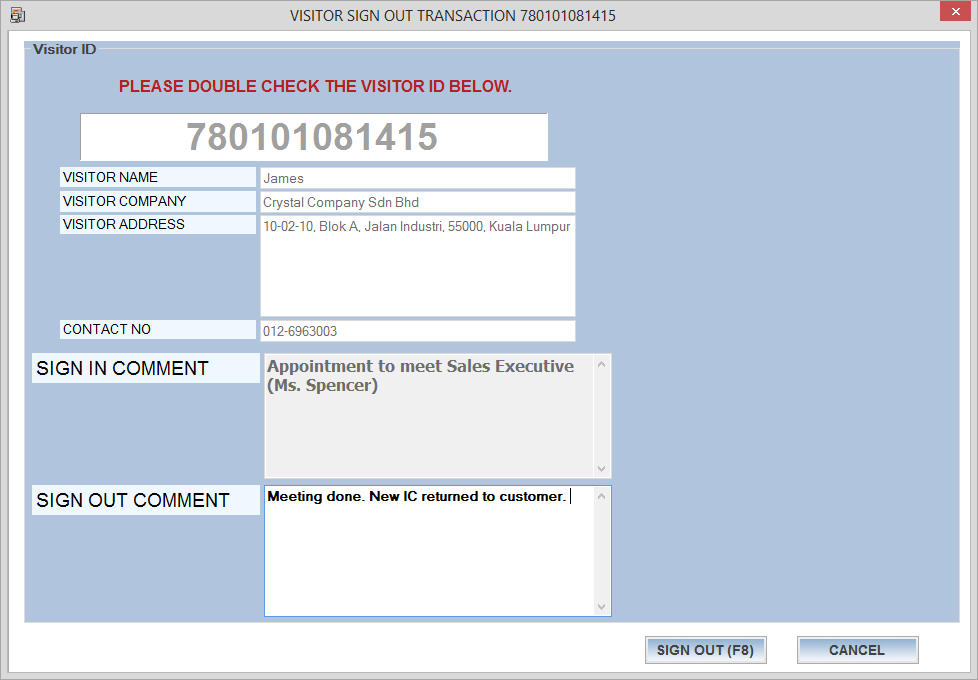
- The following window will be shown. Please enter necessary sign out comment.
- Click Sign Out (F8) button to continue.
- The following pop up message will be shown to indicate visitor successfully sign out.

Custom Fields
- Summary: This article contains steps to configure auto visitor sign out at the xPortalNet software.
- Search Tags: visitor auto sign out, visitor still in list, visitor sign in, visitor sign out, visitor card blocked, card records, visitor still in list
Comments
-
There are no comments for this article.
Submit Feedback on this Article
