


Advanced Search
Search the Knowledgebase


| Author: Microengine Views: 32209 Created: 21-04-2015 10:41 AM | 0 Rating/ Voters |
 |
This article contains steps to setup the connection for XP-M2000i controller using RS485/ RS232. The communication shall up between the controller and the xPortal software after completed the setup.
Applies To:
- XP-M2000i
- Software xPortal2005 v1.3, xPortalNet, xPortal3000
 Resolution Resolution Summary
Perform steps below to configure the XP-M2000i controller using RS485/ RS232 connection.
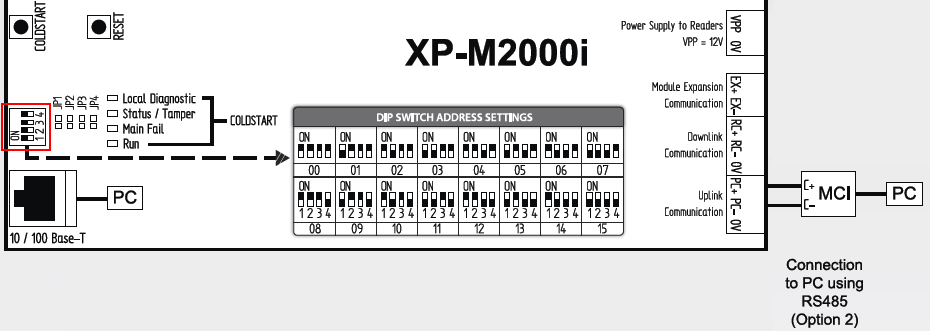
- Controller to MCI connection:
- Connect terminal PC+ and PC- to the terminal C+ and C-.

- MCI to PC connection:
- Connect the MCI to the USB RS485/ RS232 converter.
- Then plug in the converter to the PC.

- Configure the controller address according to the DIP Switch Address Setting.
- The System Address (ADDR) set in the controller must be unique and does not same Address Unit No. with other controllers.
- To set the address, see
 How to configure address setting (Unit No) for Multi-Door Controller?
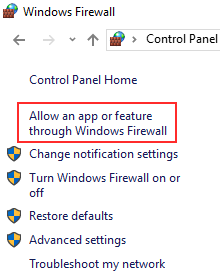
- Allow the xPortal software to communicate through Windows Firewall.
- Open Windows Firewall by clicking the Start button › Click Control Panel. In the search box, type firewall and then click Windows Firewall.
- In the left pane, click Allow a program or feature through Windows Firewall.
- Click Changes settings. If you're prompted for an administrator password or confirmation, type the password or provide confirmation.
- Select the check box next to the program you want to allow then select the network locations you want to allow communication on.
- Click OK to save the changes.

Step 4-1: Check COM Port No
- Check that the Comm Port No. where the MCI is connected is available and shown in the PC’s Device Manager.
- Run Windows Device Manager by Right-click at My Computer › Select "Manage".

- Computer Management Window will pop out. Select "Device Manager" › Select "Ports (COM & LPT)".
 If the MCI is directly connected to Server PC through CPU’s serial port RS232 cable, it will always shown COM1.
 If the MCI is connected to Server PC using USB-to-Serial port RS485 cable, it will shown the serial port no connected.
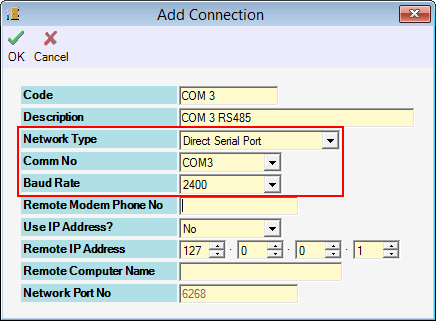
Step 4-2: Configure Connection
Select the Comm No according to the MCI COM No connected.
- Run xPortal Server software.
- Open Connection Setup. Go to Server Admin › Connection Setup.
- Add one connection as shown below:
Step 4-3: Configure Controller
Select the Connection and Controller Model No correctly.
- Run xPortal Server software.
- Open Controller Setup. Go to Server Admin › System Device Setup › Controller.
- Add one controller as shown below:
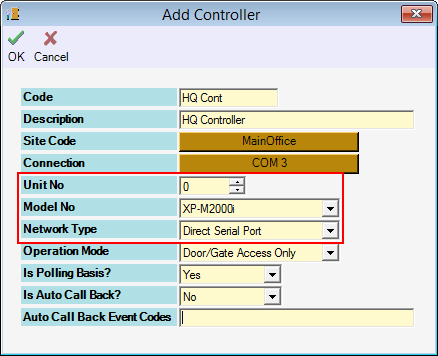
- Please set the Unit No according to the System Address (ADDR) configured.
Step 4-4: Configure Door
Set the correct Door Unit No.
- Run xPortal Server software.
- Open Door Setup. Go to Server Admin › System Device Setup › Door.
- Add one door as shown below. You may add up until 2 doors only. Including Entry and Exit for each door.
 Maximum Unit No allowed is 1. Only 2 doors allowed for this controller model.
Step 4-5: Verify Configuration
- The newly added controller and door will be shown from the Device List.
- The controller and door status should be "Up".


- Run xPortal Client software.
- Open Send Door Setting and then download setting to the controller. Go to Device Comm › Send Door Setting › Select controller › Click Send All Settings.
- Finished.
| Knowledge Base by: KnowledgeBase Manager Pro v6.2.2 (Built with: JS.GUI - AJAX Tool) |
Custom Fields
- Summary: This article contains steps to setup the connection for XP-M2000i controller using RS485/ RS232. The communication shall up between the controller and the xPortal software after completed the setup.
- Search Tags: xp-m2000i connection setup, rs485/ rs232 connection, controller down
Comments
-
There are no comments for this article.
Submit Feedback on this Article
