


Advanced Search
Search the Knowledgebase


| Author: Microengine Views: 41602 Created: 01-12-2014 04:00 PM | 0 Rating/ Voters |
 |
This article contains steps to setup the network connection for XP-M1000i controller. The communication shall up between the controller and the xPortal software after completed this setup.
Applies To:
- XP-M1000i
- Software xPortal2005 v1.3, xPortalNet, xPortal3000
 Resolution Summary Resolution
Please follow the following steps to configure the network connection for XP-M1000i controller:
Wiring Connection
- Please connect the wiring connection correctly. See
 Wiring connection diagram for XP-M1000i.
 - Please plug in the network cable at the network socket on the board.
- The Yellow LED at network cable should be blinking upon controller's power up.
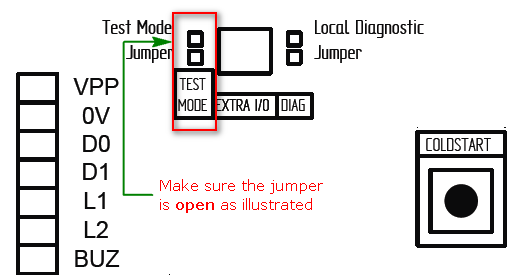
- Please open the Test Mode (JP6) jumper (If the JP6 jumper is in shorted/ closed condition).
Available IP Address
To be assigned as Controller’s IP Address.
- Please check the available IP Address from the network using Command Prompt.
- User can use command "Ping" to check the IP Address is in used/ not in used by other device.
- Run Command Prompt window from the Start Menu.
- Type ping followed by IP Address that you wish to assign to the controller › Press Enter.

- If the ping reply is "Destination host unreachable", the IP Address is available to use.
- Otherwise, please use another IP Address.
- Please get the Server IP Address, Subnet Mask and Gateway from Server PC’s configuration.
- On Server PC, please run Command Prompt window from the Start Menu.
- Type ipconfig › Press Enter.
 The information highlighted in the red box will be use on the Network Configuration from the Web Diagnostics.
- Login to Controller Web Diagnostic.
- Open browser and type http://192.168.1.10 (Default IP Address) in the address box.
- Key in the default username and password to login.
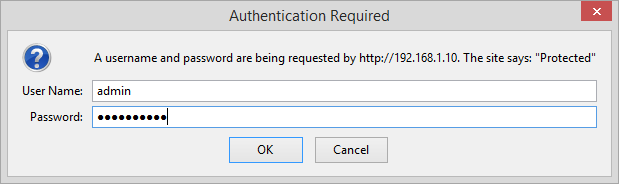
- The following windows will be shown:

- To configure the controller's IP Address, open Network Settings. Go to Configuration › Network.

- Please set the network setting accordingly.
- IP Address: IP Address set for the controller.
*The IP Address must be unique. It shall not be occupied by other device on the same network. - Subnet Mask: Similar to Server PC’s Subnet Mask.
- Gateway: Similar to Server PC’s Default Gateway.
- Server IP Address: IP Address where the xPortal Server is located.
- Click Save Setting to confirm and save the changes.
Server Configuration
Login to xPortal Server and configure server setup accordingly.
- Open Connection Setup. Go to Server Admin › Connection Setup.
- Please add new connection as shown below.
 The Remote IP Address is the controller's IP Address.
 - Click OK to confirm and save changes.
Controller Setup
- Open Controller Setup. Go to Server Admin › System Device Setup › Controller.
- Please add new controller as shown below.
- Connection: Connection created from the Connection Setup
- Model No: XP-M1000i
- Network Type: LAN (MV25)/ LAN (Built-In)
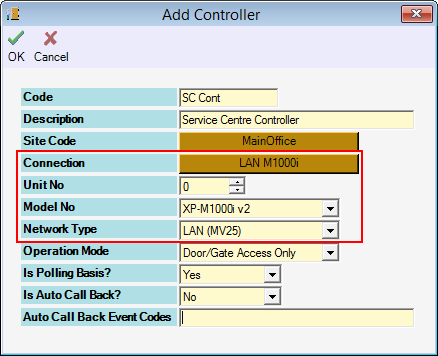
- Click OK to confirm and save changes.
Door Setup
- Open Door Setup. Go to Server Admin › System Device Setup › Door.
- Please add new door as shown below.
- Please set Unit No to 0 as this is a single door controller. User can add 1 door only (Entry & Exit).

- Click OK to confirm and save changes.
Device List
- The software will be reloaded after saving each setup.
- After finish configuring the setup, please observe the Device List.
- The controller and door status should already "Up".


- Finished.
Custom Fields
- Summary: This article contains steps to setup the network connection for XP-M1000i controller. The communication shall up between the controller and the xPortal software after completed this setup.
- Search Tags: xp-m1000i, network connection, lan connection, uplink, add connection
Comments
-
There are no comments for this article.
Submit Feedback on this Article
