


| Author: Microengine Views: 17538 Created: 12-11-2015 06:25 PM | 0 Rating/ Voters |
 |
This article contains steps to configure Guard Tour Door using xPortalNet.
Applies To:
- XP-M2000i v6.10 and above, XP-M1000i v2 v6.00 and above, XP-SNET
- Software xPortalNet v1.5
 Resolution Summary Resolution
Follow steps below:
Note: Please configure the controller & please add Guard record from the Staff Records before proceed.
This setup will configure which reader (Door) to become the Guard Tour Reader.
- Login to xPortalNet Client.
- Open Guard Tour Reader. Go to Guard Tour › Guard Tour Reader.
- The following window will be shown.
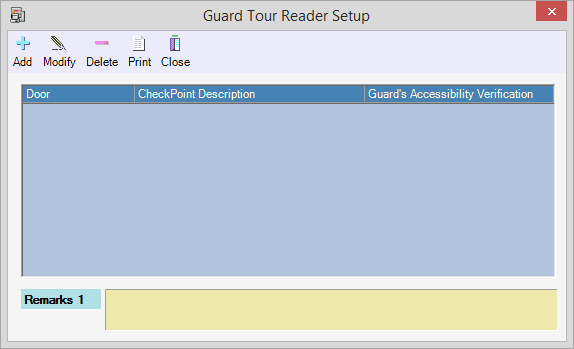
- Click Add to add new guard tour reader.
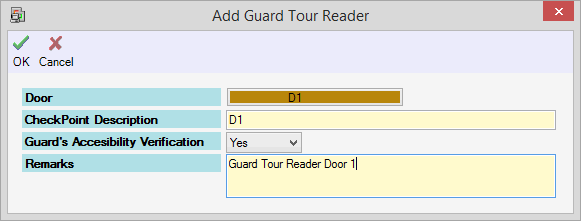
- Fill in the following fields:
Field Description Door Select door name CheckPoint Description Fill in the CheckPoint Description Guard's Accessibility Verification Yes - Guard can perform Guard Tour and have valid access to this door
No - Guard can perform Guard Tour only and have no access to this doorRemarks Add any remarks - Click OK to confirm and save settings.
Configure Guard Tour Check Point
This setup will configure the route for guard tour, including the route check points and the guard card assign for each route.
- Open Guard Tour Reader Check Point. Go to Guard Tour › Guard Tour Check Point.
- The following window will be shown.
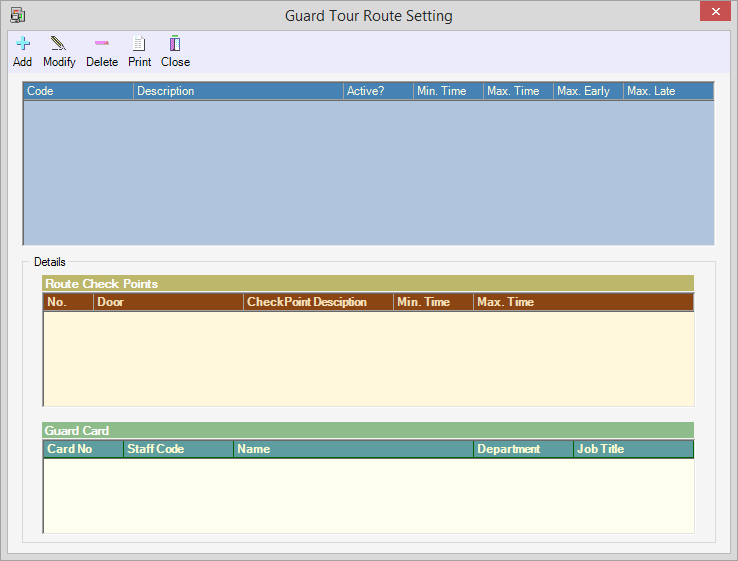
- There are 3 setups in this section. Please perform all.
- Configure Route
- Configure Route Check Points
- Assign Guard Card
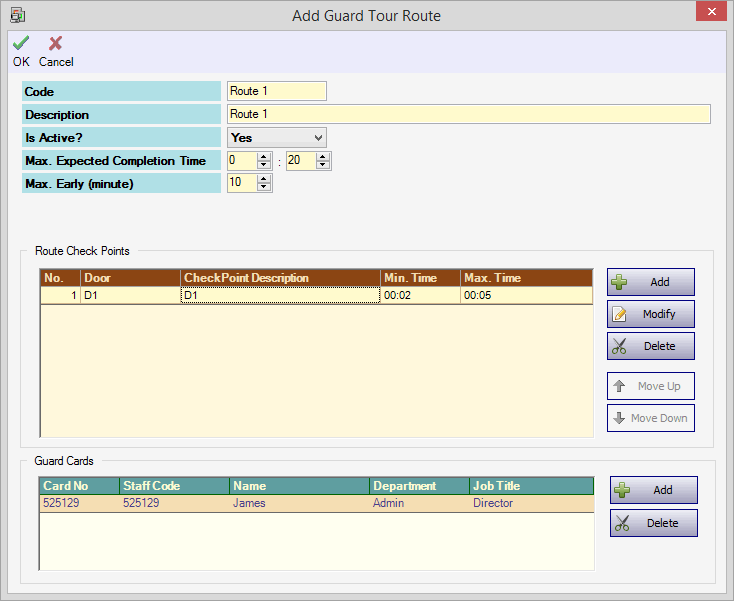
This setup will add new route for guard tour.
- Click Add to add new route.
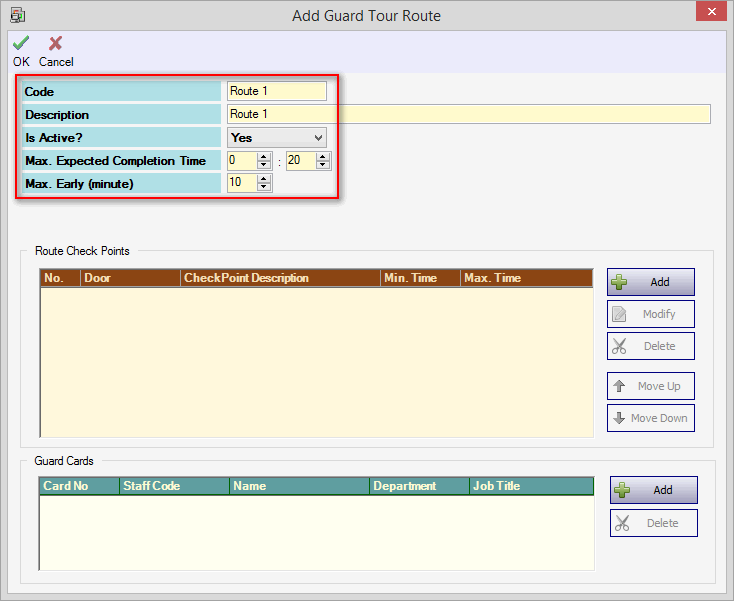
- Fill in the following fields:
Field Description Code and Descriptions Add code and descriptions Is Active? Yes - Activate the route to be checked
No - Deactivate the route to be checkedMax. Expected Completion Time Max time estimated to complete checking all route check points Max. Early (minute) Max early time estimated to complete checking all route check points
Configure Route Check Points
This setup will add new route check points for the route created.
- Click Add to add new route check points.
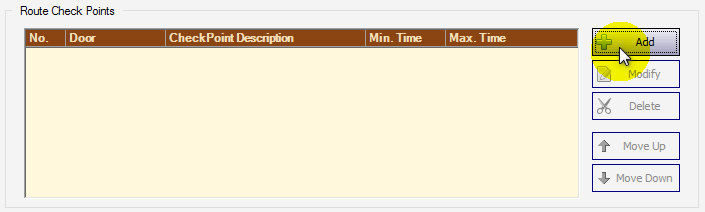
- The following window will be shown.
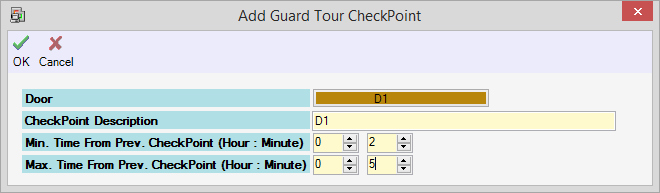
- Fill in the following fields:
Field Description Door Select door to be check under this route CheckPoint Description Fill in the CheckPoint Description Min. Time From Prev. CheckPoint (Hour : Minute) Select the Min time allowed to arrive at the checkpoint Max. Time From Prev. CheckPoint (Hour : Minute) Select the Max time allowed to arrive at the checkpoint - Click OK to confirm and save settings.
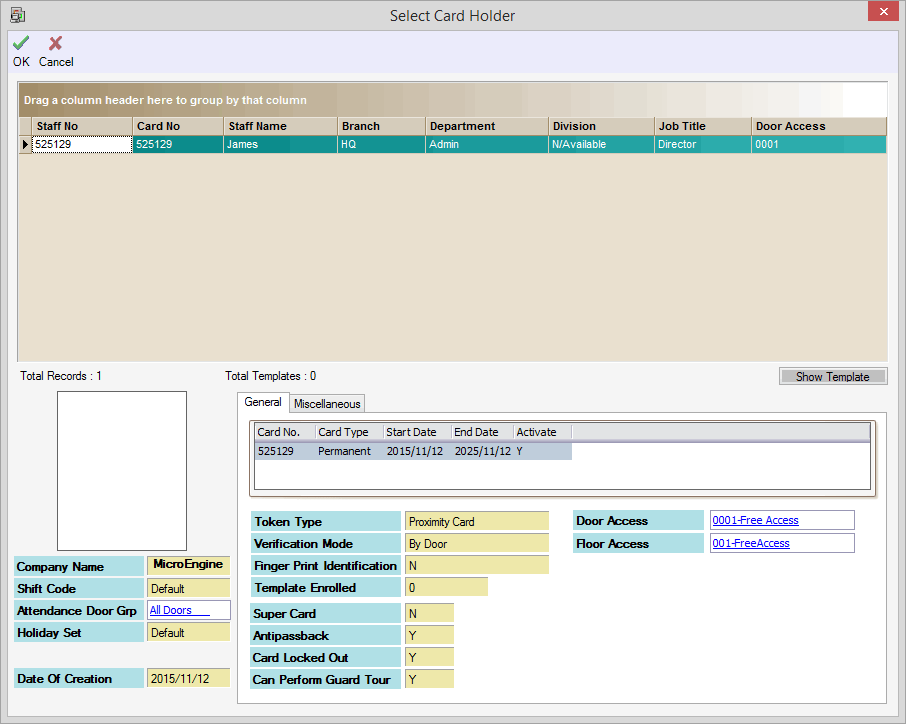
Assign Guard Card
This setup will assign the guard card for the route created.
- Click Add to assign the guard card for the route.

- The list of guard card will be shown. Please select the guard card to assign for the route checking.
- After configure the Route, Route Check Points and Guard Card, click OK to confirm and save settings.
- Please repeat this steps to add next route.
Configure Guard Tour Schedule
This setup will configure the guard tour schedule for each route created.
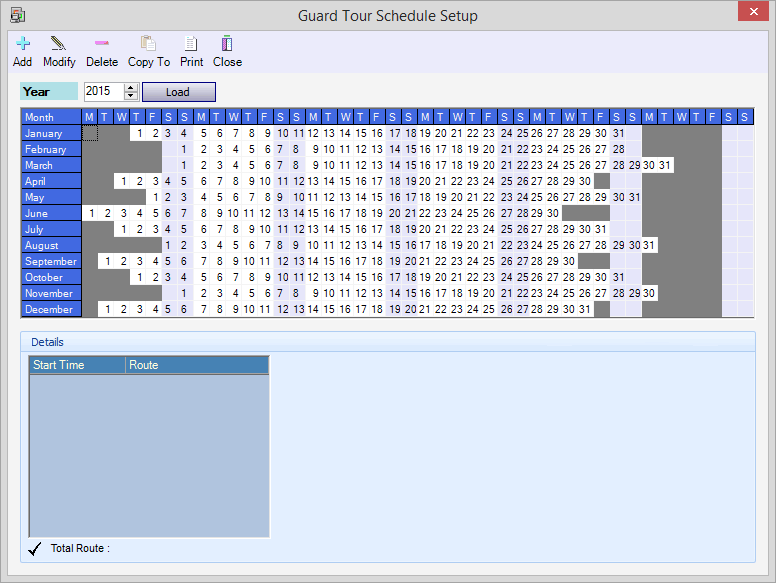
- Open Guard Tour Schedule. Go to Guard Tour › Guard Tour Schedule.
- The following window will be shown.
- Click Add.
- The following window will be shown.
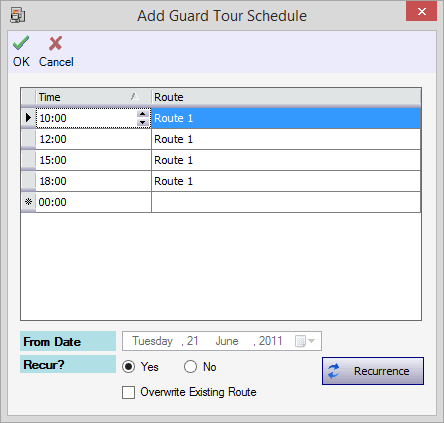
- Click on the Time cell to set the guard tour checking schedule.
- Then, click on the Route cell to select which route to be checking for the selected time.
- Date settings:
Field Description 1 day guard tour schedule 
- From Date: Select guard tour date checking
- Recur?: Select No
Few days with similar guard tour schedule 
- Recur?: Select Yes

- Select the Recurrence pattern and the Range of recurrence.
- Click OK to confirm and save settings.
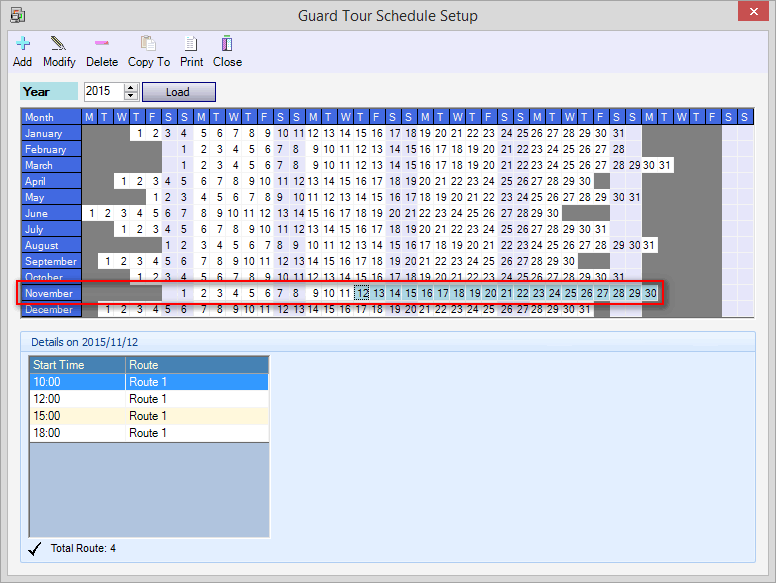
- After saving the settings, the schedule shall be added into the calendar.
- The schedule shall be highlighted with blue color.
Observe Transaction
- After completed all setup, please verify the Active Guard Tour. Go to Guard Tour tab › Active Guard Tour.
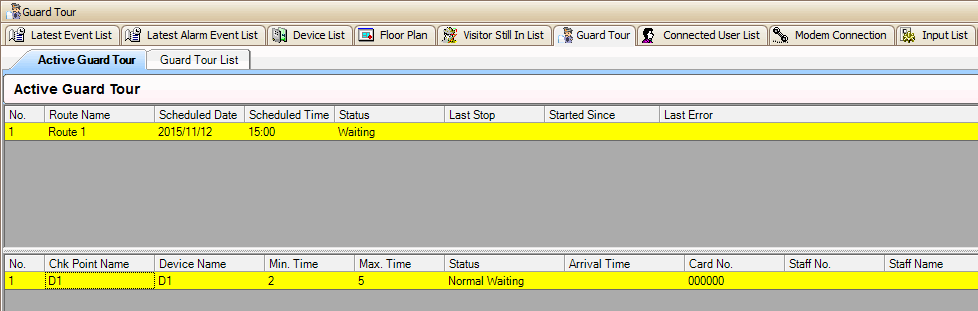
- The Active Guard Tour shall listing all waiting route for the guard tour checking according to the Guard Tour Schedule configured.
- After the guard staff perform the guard tour checking, the waiting route will be removed from the Active Guard Tour list.

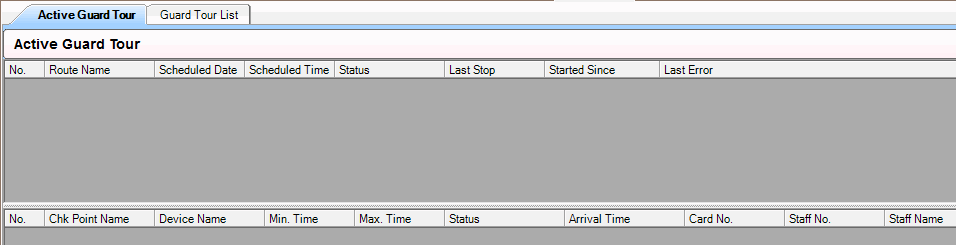
- Please open the Guard Tour List to check the completion status. Go to Guard Tour tab › Guard Tour List.
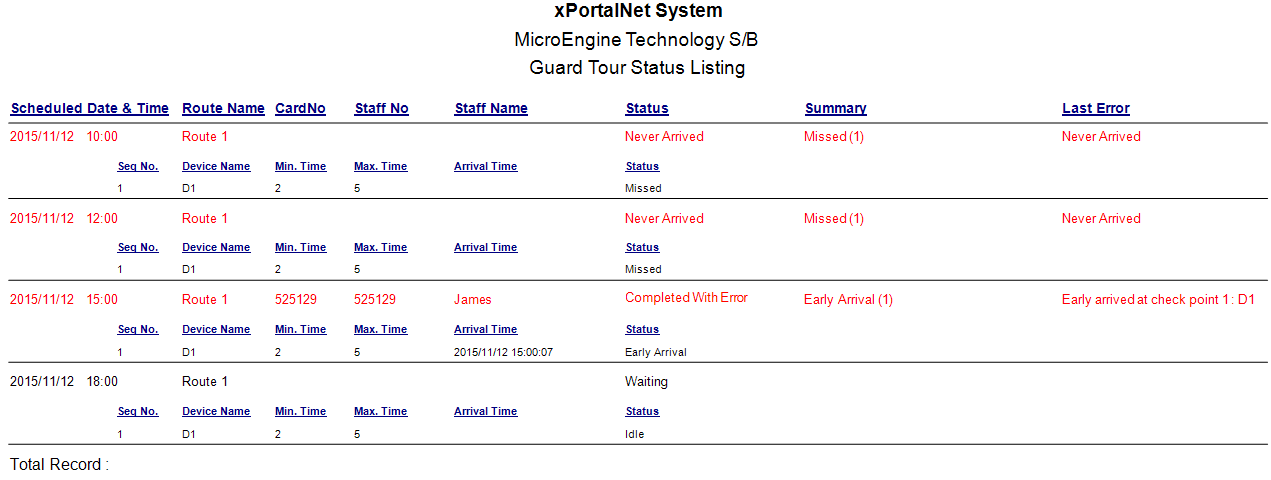
 If the guard completed the route checking earlier than they should be, the status shall be "Completed With Error".
 - Please open Guard Tour Transaction Reporting to generate the guard tour report. Go to Reports › Event Report › Guard Tour Transaction Reporting.
- Finished.
- Summary: This article contains steps to configure Guard Tour Door using xPortalNet.
- Search Tags: guard tour door, how to configure guard tour, guard, tour, guard tour
-
Hi Bunthoeun,
The error stated is because of database error. Unfortunately we cannot provide the solution here because we need to check your database directly. Kindly call our service center at 03-79582028 for further help.

I could not any door for guard tour , When I add new guard tour I got error message "Record Listing Error!!", Could you someone share me how to do it?