


Advanced Search
Search the Knowledgebase


| Author: Microengine Views: 37287 Created: 13-04-2015 11:31 AM | 0 Rating/ Voters |
 |
This article contains steps to setup the connection for XP-M1000i controller using RS485/ RS232. The communication shall up between the controller and the xPortal software after completed the setup.
Applies To:
- XP-M1000i
- Software xPortal2005 v1.3
- Software xPortalNet
- Software xPortal3000
 Problem Symptoms Cause (optional) Resolution Summary Resolution
Please complete the following steps:
- Ensure the connection from the controller to the PC is correct.
- Refer Figure 1 & 2 below:

Figure 1
Figure 2
- Ensure Test Mode (JP6) jumper is open.
- Ensure the System Address (ADDR) set in the controller is unique and does not same Address Unit No. with other controllers.
- Refer Figure 3 below:

Figure 3
Resolution 3:
› Make sure the configuration setup at the software is correct.
Step 1: Check COM Port No
- Ensure that the Comm Port No. where the MCI is connected is available and shown in the PC’s Device Manager.
- Open Windows Device Manager. Right-click at My Computer › Select "Manage".

- Computer Management Window will pop out. Select "Device Manager" › Select "Ports (COM & LPT)".
If the MCI is directly connected to Server PC through CPU’s serial port (RS232 cable):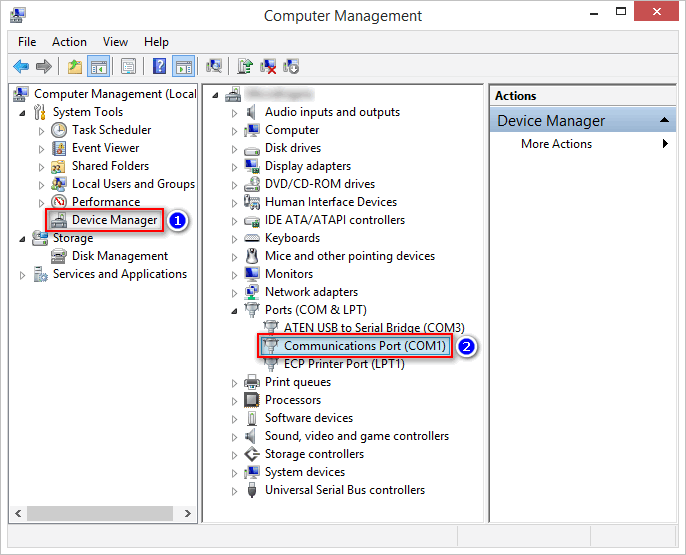
If the MCI is connected to Server PC using USB-to-Serial port (RS485 cable):
Step 2: Check Connection Setup
- Ensure that the Comm No selected in the Connection Setup is similar to the MCI COM No connected.
- Run xPortal Server software.
- Open Connection Setup. (Go to Server Admin › Connection Setup)
- Add one connection as shown below:

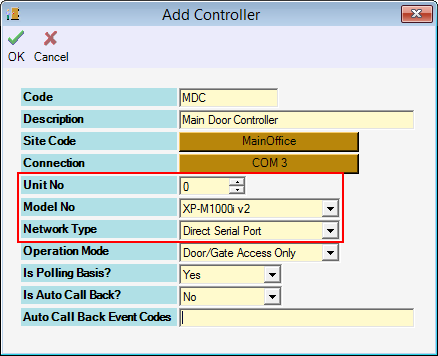
Step 3: Check Controller Setup
- Make sure the Controller Model No set in Controller Setup at software server is correct.
- Run xPortal Server software.
- Open Controller Setup. (Go to Server Admin › System Device Setup › Controller)
- Add one controller as shown below:
- Make sure the Door Unit No set in Door Setup at software server is correct.
- Run xPortal Server software.
- Open Door Setup. (Go to Server Admin › System Device Setup › Door)
- Add one door as shown below. Make sure the Unit No is set to 0.

Step 5: Check Controller Status
- Make sure the controller status is "Up".
- The newly added controller will be shown in the Device List.

- Make sure the door status is "Up".
- The newly added door will be shown in the Device List.

- Run software client.
- Open Send Door Setting and then download setting to the controller.
(Go to Device Comm › Send Door Setting › Select controller › Click Send All Settings)
- Turn off the firewall to allow the communication between software and controller.
- Go to Control Panel › System and Security › Windows Firewall › Turn Windows Firewall on or off.

Custom Fields
- Summary: This article contains steps to setup the connection for XP-M1000i controller using RS485/ RS232. The communication shall up between the controller and the xPortal software after completed the setup.
- Search Tags: xp-m1000i connection setup, rs485/ rs232 connection, controller down, beep sound keeps beeping
Comments
-
There are no comments for this article.
Submit Feedback on this Article
