


Advanced Search
Search the Knowledgebase


| Author: Microengine Views: 40978 Created: 23-03-2015 09:11 AM | 0 Rating/ Voters |
 |
This article contains steps to configure the XP-SNET Lift Floor Access at xPortalNet Server.
Applies To:
- Software xPortalNet
- XP-SNET
 Problem Resolution Summary Resolution
Setup in xPortalNet Server
- Run xPortalNet Service. Make sure the service is started.
- Run xPortalNet Server.
- Configure server setups as shown below accordingly:
Connection Setup
- Open the Connection Setup. (Go to Server Admin › Connection Setup)
- Add one connection.
- Click OK to confirm and save the settings.

» Make sure the Remote IP Address is your controller’s IP Address.
See AA-00302 to set IP address for the controller.
Controller Setup
- Open the Controller Setup. (Go to Server Admin › System Device Setup › Controller)
- Add one controller.
- Click OK to confirm and save the settings.

» Make sure the Unit No is the same with your controller’s Unit No.
See AA-00332 to configure Unit No from the DIP Switch Address for the controller.
Door Setup
- Open the Door Setup. (Go to Server Admin › System Device Setup › Door)
- Add one door.
- Click OK to confirm and save the settings.
- If reader is connected directly to XP-SNET’s base board (CON32 as entry, CON33 as exit) OR connected to MK800:
- Directly connect to (CON32 as entry, CON33 as exit):

- Connected to MK800:

- If reader is connected using TTL connection:

Lift Panel Setup
- Open the Lift Panel Setup. (Go to Server Admin › System Device Setup › Lift Panel)
- Add one lift panel.
- Click OK to confirm and save the settings.
- Make sure Lift No is the same with the Door Unit No.

» 1 Lift Panel is for 1 XP-SNET controller. Add another lift panel if you have more than 1 XP-SNET controller.
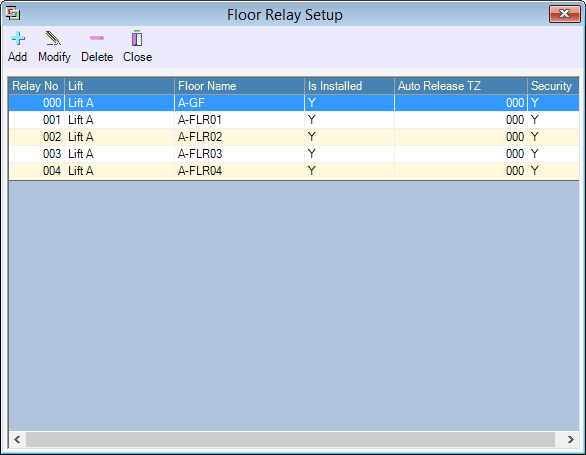
Floor Relay Setup
- Open the Floor Relay Setup. (Go to Server Admin › System Device Setup › Floor Relay)
- Add floor relays accordingly.
SNET-E32R Board Address (Dip Switch Setting) Relay Number Range (At Software) 0 0-31 1 32-63 2 64-95 3 96-127 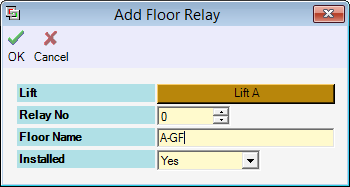
- Click OK to confirm and save the settings.
- Example to add five floor relays:
- The newly added controller and door will be shown in the Device List. The status should be Up.


- You have completed the setup at xPortal Server.
- Please continue the setup at xPortal Client. See AA-00301 for the configuration steps.
Custom Fields
- Summary: This article contains steps to configure the XP-SNET Lift Floor Access at xPortalNet Server.
- Search Tags: xp-snet lift floor access, configure lift, lift panel setup, floor relay setup
Related Articles
Comments
-
There are no comments for this article.
Submit Feedback on this Article
