


| Author: Microengine Views: 44067 Created: 26-02-2015 05:17 PM | 0 Rating/ Voters |
 |
This article contains steps to setup the network connection for XP-GT/ XP-GTR controller. The communication shall up between the controller and the xPortal software after completed the setup.
Applies To
- Software xPortal2005 v1.2 and above, xPortal2007, xPortalNet, xPortal3000
- XP-GT1200L/ XP-GT3200L (v3.0.0.12 and older), XP-GT1200LABX/ XP-GT3200LABX
- XP-GT3200LE, XP-GT3200LCPX, XP-GT500LE
- XP-GTR1200L/ XP-GTR3200L (v2.38 and older)
To configure the XP-GT/ XP-GTR controller model using network connection, you are required to connect the controller to the network connection. After configuring the wiring connection, please perform all steps below which is setup the software configurations.
Pre-Configuration
Please perform the following steps before you proceed to configure the network connection.
- Please connect the controller to a network switches/ router using a network cable.
- Please allow the apps through Windows Firewall to allow the communication between software and controller.
- Open Windows Firewall by clicking the Start button › Click Control Panel. In the search box, type firewall, and then click Windows Firewall.
- In the left pane, click Allow a program or feature through Windows Firewall.
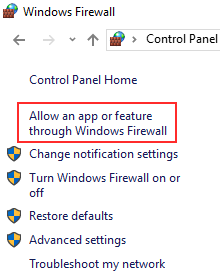
- Click Changes settings. *If you're prompted for an administrator password or confirmation, type the password or provide confirmation.
- Select the check box next to the program you want to allow then select the network locations you want to allow communication on.
- Click OK to save the changes.

- Please configure the Server PC's IP Address to Static/ Fixed IP Address.
- Open Network and Sharing Center. (Control Panel » Network and Internet » Network and Sharing Center)
- Click Change adapter settings.

- Right click on network connection » Properties.

- At Ethernet Properties, select Internet Protocol Version 4 (TCP/ IPv4).
- Then click Properties.

- Do not select "Obtain an IP address automatically".
- Please configure the IP address, Subnet mask and Default gateway accordingly.
 Kindly request from your IT Technician to configure this setup for your Server's PC.
- Please use the Command Prompt to check the preferable IP Address which is not in used.
- Click Windows Start button › Type cmd at search box and press "Enter" to run the Windows Command Prompt.
- Use ping command as the following example to find unassigned IP Address from the network.
- Type "ping" command followed by preferable IP address and then press "Enter".
» Eg: ping 192.168.1.23 - If no replies, IP Address is available to use for the controller:

- If have replies, IP Address is occupied. Try to ping another IP Address.

Controller Network Configuration
Please perform the following steps after completed the pre-configuration.
- Check the Server PC’s IP configuration. Open Windows Command Prompt.
- Type "ipconfig" command and then press "Enter".

- Note down the IPv4 Address, Subnet Mask and Default Gateway. Those fields will be used in the next steps.
- Go to Controller, enter Programming Mode.
- Refer to the table below for description of each icon on the controller.
Field Description 
To cancel a function or go to the previous screen 
To select a parameter to change/ confirm a setting or value 

To toggle between options/ scroll up or down the menu - Press "1" for System Menu then press "7" for Network Settings.
- Configure the network settings as follows:
Network Settings Steps LED Displays Local IP Address Enter the Local IP Address with the IP Address which is unassigned to any network devices
(Refer steps Find Unique IP Address for controller)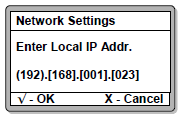
Local Port Number Remain the Local Port No as default (6268) 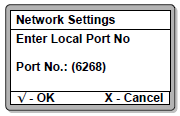
Remote IP Address Enter the Remote IP Address which is the Server PC’s IP Address
(For WAN connection, please make sure to configure port forwarding for this IP Address at the router. Please request from your IT Technician to configure the settings)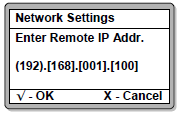
Remote Port Number Remain the Remote Port No as default (6268) 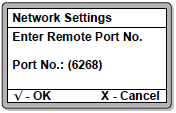
Subnet Mask Enter the Server PC’s Subnet Mask 
Gateway IP Enter the Server PC’s Gateway 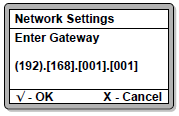
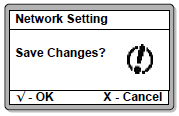
- Save the settings. Changes will only takes effect after reset.
- Perform Power Reset or Test Watchdog to reset the controller.
- To perform Power Reset: Power off the controller › Power on the controller.
- To perform Test Watchdog:
- Press "4" for Maintenance menu.
- Press "3" for Test Watchdog. The screen as below will be shown:
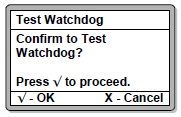
- Press '
 ' to proceed.
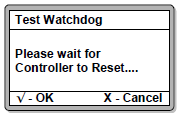
- The controller should reset itself in not more than 10 seconds.
Controller Configuration Setup at Server
Run xPortal Server software and configure following setup.
- Open Connection Setup. (Server Admin » Connection Setup)
- Add one connection as shown below:
 Please set the Remote IP Address to IP Address which already assigned for the controller.
- Open Controller Setup. (Server Admin » System Device Setup » Controller)
- Add one controller as shown below:
 Please select the correct Controller Model No.
- Open Door Setup. (Server Admin » System Device Setup » Door)
- Add one door as shown below.

- The newly added controller will be shown in the Device List. The status should be "Up".

- The newly added door will be shown in the Device List. The status should be "Up".

- Run xPortal Client. Open Send Door Setting.
- Click Send All Settings. (Device Comm » Send Door Setting » Select controller » Send All Settings)
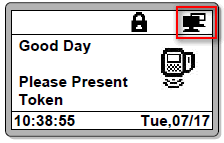
- To determine the controller is up, you should noticed that the PC’s icon is blinking at the top right hand side of the controllers' LED displays.
- Finished.
- Summary: This article contains steps to setup the network connection for XP-GT/ XP-GTR controller. The communication shall up between the controller and the xPortal software after completed the setup.
- Search Tags: network connection setup xp-gt, xp-gtr, lan connection, wan connection, controller down, uplink failed
-
There are no comments for this article.
